Ye blog of Adam Wright
DIY, tutorials, stuff for geeks, all updated when I have the time to spare.
Monthly Archives: April 2012
How to increase the size of a VirtualBox hard drive
Posted by on 04/03/2012
These are the steps to increase the virtual hard drive size of a VirtualBox machine. These worked for me in Ubuntu linux, but the command should work for Windows as well I believe.
EDIT: Reader recuperar arquivos confirms that this also works in Windows.
Snapshots aren’t supported so first you’ll need to clone the current snapshot into a new machine. Once that’s done, open up a terminal window and type this:
vboxmanage modifyhd “/file/location/of/virtual/harddrive.vdi” –resize 40960
(that “resize” flag needs a double-hyphen in front of it, not just one)
40960 MB = 40 GB
If you want to resize to say, 100GB, you’d use 102400 at the end.
Any questions feel free to leave a comment!
How To Make Outlook’s Inbox More Like Gmail’s
Posted by on 04/03/2012
My favorite difference between Gmail and other webmail services is the way Gmail’s Archive feature works with the inbox. You don’t realize it, but when you use Gmail, all of your email is located in one folder, and when new email is received, it gets an “Inbox” label. Your Inbox is just a label that shows any email with the “Inbox” label. Archiving an email removes the “Inbox” label, thereby removing it from your Inbox folder.
Outlook can be customized to act the same way, with some easy tweaks:
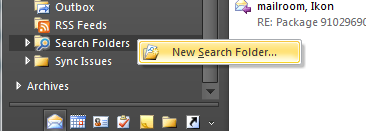
- Create a new Search Folder.

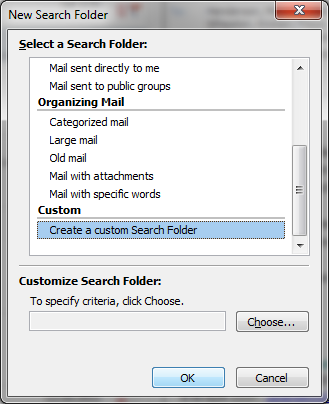
- Select “Create Custom Search Folder” at the bottom.

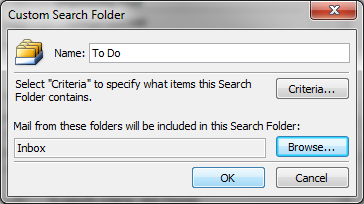
- Click “Choose…” button to customize the search folder. Name the folder “To Do” (or whatever you like), and set it to look in the Inbox.

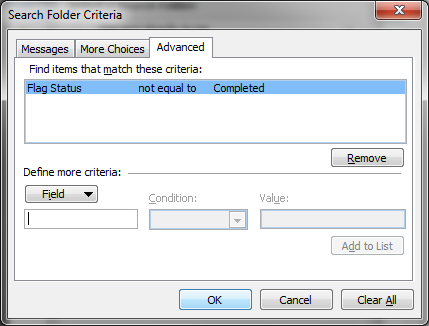
- Click on the “Criteria…” button. You’re only going to set one rule; under the Advanced tab add a rule for “Flag Status not equal to Completed”.

- Hit “OK” to close the customization window and finish creating the Search Folder. Now right-click on the search folder you just made and click “Show in Favorites”.

- Now, all email messages will stay in the “To Do” folder until you mark their flag status as complete. No deleting messages, and they all stay in your Inbox folder. However, if you still prefer using folders, you can move emails into individual folders inside your inbox if you want and the “To Do” Search Folder will still show them like in my screenshot:


- OPTIONAL: Use color codes to sort importance of emails and current projects.


Any new emails show up in the “To Do” Search Folder, you can move them to subfolders within the Inbox folder and they’ll still remain in the “To Do” Search Folder.
Here’s my methodology for getting through all my daily email:
- If its just a quick “throw away” email (i.e. quick responses, “Thanks”, “Sounds good.”, office SPAM, etc) I just Mark Complete and it disappears from the “To Do” Search Folder.
- Anything else gets a color category so I can see what the email is (current project, information, backburner, paused project, etc) visually with a quick look.
- Current project emails (red category) just details any emails that have to do with the current projects I’m working on. That doesn’t mean the current email I’m working on. For that, I use the Follow Up flag. A single click on it turns it to a red flag (“Today” flag technically). In the screenshot above you can see the ship notification email is a current email I’m working on today.
- Lastly, once I’m done with the email I flag the email as complete, and it disappears from the “To Do” Search Folder. If the email already has a Follow Up flag, just another single click flags it complete and it disappears.
Any questions feel free to leave a comment!
Jeff Larsen notes that you can make Outlook behave even more like Gmail by following his method of grouping your replies to conversations in your inbox together with the messages you receive.
Thanks Jeff!